One of our faculty recently had an issue where a student in her blended course ended up in a unique situation due to circumstances beyond the their control: the student began taking a quiz in D2L late one night, but in the middle of the attempt the server was taken down for maintenance, and by the time the server came back up, the quiz duration had expired. The student explained this to the faculty, and the faculty setup additional time in the Quiz’s Special Access section for the student to take the quiz again. However, when the student went to take it again, they found they weren’t able to access the quiz due to a Special Access timing bug in D2L. While the faculty could reset the Special Access parameters to give the student another try, the window for taking this quiz was almost up: the faculty was scheduled to review the quiz in class that evening. The best solution was to print out the quiz and let the student take it on paper just before it was to be reviewed – this would guarantee it could be completed without any further technical issues. Surely there must be an easy way to print out a quiz in D2L, right? Actually, there isn’t, but here’s how we were able to do it:
- Click on the Quizzes tool in your course’s D2L menubar and select Edit from the menu that appears after clicking the triangle to the right of the quiz’s name.
- Click the Submission Views tab.
- Click the Add Additional View button.
- Give the View a descriptive Name, something like printing view, then skip down to the View Details section.
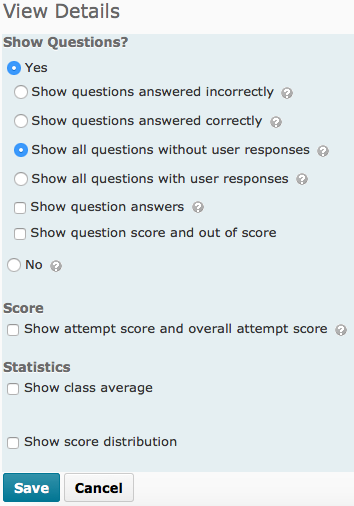
- Under Show Questions?, select Yes and Show all questions without user responses. All remaining choices from this point on should not be selected or checked (this includes everything in the Score and Statistics sections).
- Click the Save button.
- Click on Quizzes in your course menubar again, then click the triangle to the right of the quiz’s name again. Select Preview.
- Click the Start Quiz! button. A confirmation window appears – click the OK button.
- Click the Go to Submit Quiz button. A confirmation window appears – click the Yes button.
- Click the Submit Quiz button. A confirmation window appears – click the Yes, submit quiz button.
- Towards the top of the page you should see Submission View: followed by a dropdown menu. In that menu, select printing view (or whatever you named the View in step 4).
- You should now see the entire quiz. The quiz is in its own browser frame, so make sure your mouse is somewhere over the quiz and right-click (Windows) or Control-click (Mac). In the contextual menu that appears, select This Frame > Print Frame… (this direction assumes you’re using Firefox as your browser, so the commands in other browsers may be slightly different).
- Print the document.
After you’ve printed, you’ll probably want to delete the View you just created (otherwise, students will also be able to see it after completing the quiz). To do this:
- Click on the Quizzes tool in your course’s D2L menubar and select Edit from the menu that appears after clicking the triangle to the right of the quiz’s name.
- Click the Submission Views tab.
- Check the checkbox to the left of the name of the View you created from step 4 in the previous set of instructions.
- Click the trash can icon either above or below the list of Additional Views. A confirmation window appears – click the Yes button.
Comments (6)